Would it even be a lockdown if I didn’t blog about Banana Bread and Sourdough. I thought I would do a bread round up post and tell you a little bit about our sourdough journey…
I have been dying to create sourdough bread since about forever… as it is we make bread every single day. But during lockdown, while we could get flour, yeast became impossible to source. Now, I hate to buy shop bread for two reasons: firstly, they come with a little plastic tag that just do my head in (so the packaging actually offends me) and secondly, because I am feeding an army of teenagers that eat A LOT MORE THAN YOU CAN IMAGINE. Shop bread just doesn’t fill the cracks. And so like most new habits, I was forced into learning a new skill and our dependancy on yeast flew out of the door.
I have to say that we don’t use any fancy flour, just the regular baking flour we buy from the supermarket. No fancy equipment: a wide-mouthed jam jar and a cloth, a mixing bowl and a tea towel. Nothing fancy, no extra gear… we are just baking bread over here, not trying to build a space rocket.
Meanwhile, I love and adore the folk at Gartur Stitch Farm and follow them on instagram avidly, and they have a #garturstichbakealong hashtag to follow along. So I watched their video to learn how to make a starter and it couldn’t be easier…
Creating Your Starter
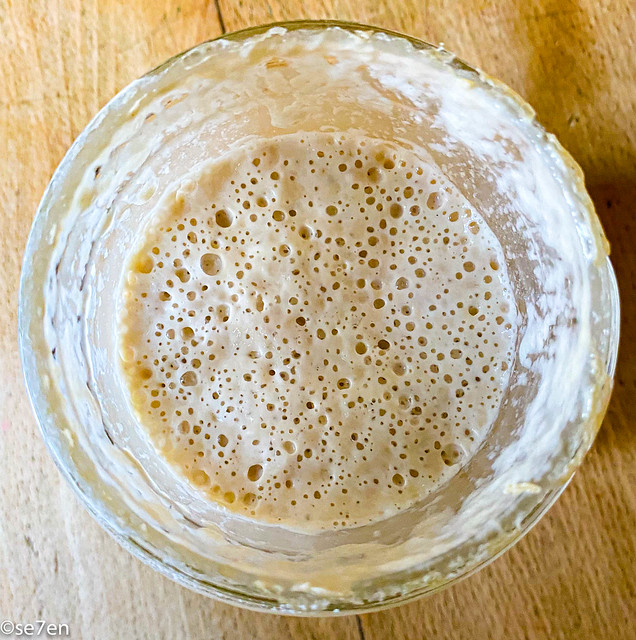
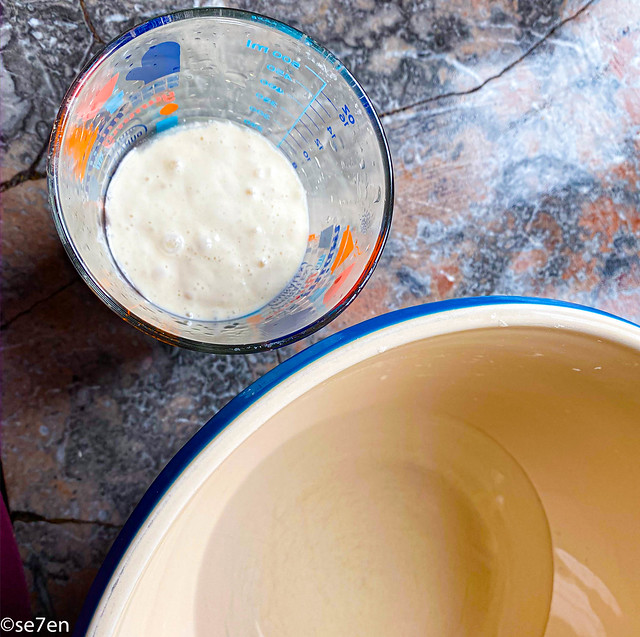
With your wide-mouthed jar, all you need are equal parts water and flour. We began with 100g of each mixed together, and left it until the next day. Each day we took out about half the mixture, (that’s called the discard and we added it to our regular pancake mix). We replaced the discard with a mixture of 50g of water and flour.
- Day 1: 100g flour and 100 g water mixed together in a wide mouthed jar.
- Day 2: Remove half the mixture for pancakes and added a mixture of 50g flour and 50g water.
- Day 3: Remove half the mixture for pancakes and added a mixture of 50g flour and 50g water.
- Day 4: Remove half the mixture for pancakes and added a mixture of 50g flour and 50g water.
- Day 5: Remove half the mixture for pancakes and added a mixture of 50g flour and 50g water.
- Day 6: Remove half the mixture for pancakes and added a mixture of 50g flour and 50g water.
- Day 7: Ready to bake…
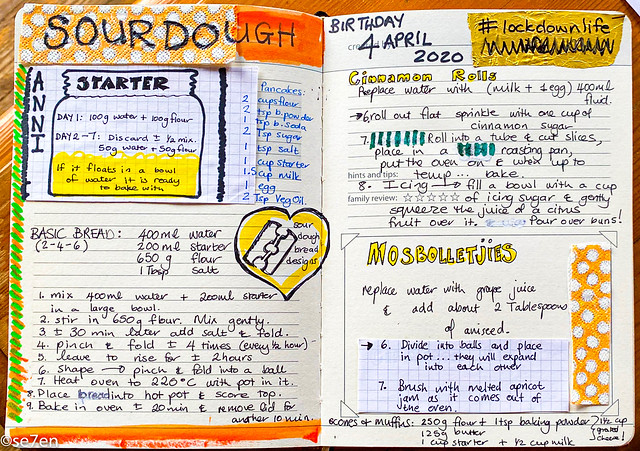
We waited a week, until we had a busy little sourdough bubbling and growing. Of course we named our sourdough… as one must. Ours is called Anni, after my hardworking mum. And our sourdough is hardworking… we use it to make something every single day, often twice a day. At least one loaf of bread a day, and then muffins, cheese scones, pancakes, cinnamon buns, pizza base and even mosbolletjies.
Basic Bread
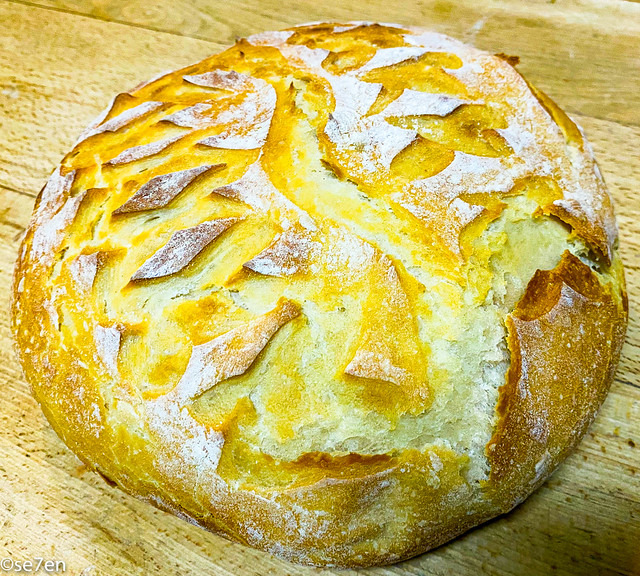
Again I used the Gartur Stich Farm Tutorial on their insta highlights, and I start it the night before. I mix the ingredients when I get home from my run in the morning, add the salt half an hour later after breakfast and then I give it a turn on the counter a couple of times throughout the morning and leave it to prove on the counter into the afternoon when I bake. Sometimes I make it in the evening as well, in which case I just leave it in the fridge overnight and bake it in the morning about half an hour before we want to have breakfast. When I am ready to bake, I shape the bread, and heat the oven up, with the baking pot in the oven. Once the oven is up to temperature, put the loaf into the pot with the lid on and quickly score the top. Then into the oven, twenty minutes with the lid on, ten minutes with the lid off and then leave it to cool, just a little bit, before it is eaten up.
Basic Bread Ingredients
- 400ml water
- 200ml starter
- 650g flour
- 1 Tablespoon of salt
How to Create Basic Bread
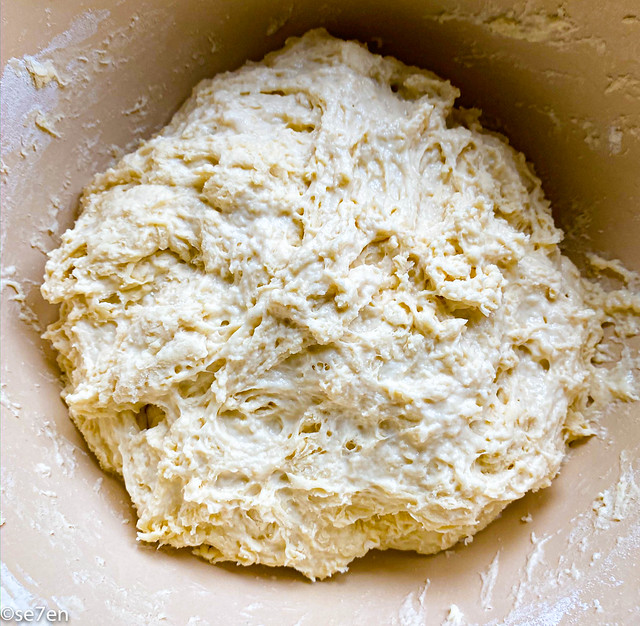
- Mix 400ml of tap water with 200ml of starter in a large bowl.
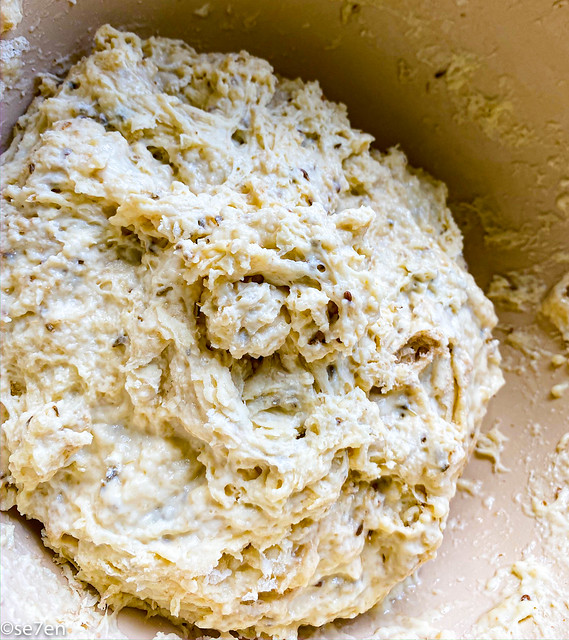
- Then add about 650g of flour and stir it through, you will have a wet and sticky mixture. (My first mistake was to think that this was way too runny and add a whole lot more flour to the mixture… for regular bread made with instant yeast, that I always made before, you have a much firmer and kneadable dough.) So for sourdough bread you need a much “wetter” dough, don’t worry about it… time is going to solve this problem.
- Go away and do something for about twenty minutes and then come back… the flour will have absorbed a lot of the moisture and already the dough will be less sticky. Add about a tablespoon of salt to your dough… then pinch bits of dough from the bottom and pull it to the top, until the salt is mixed through…
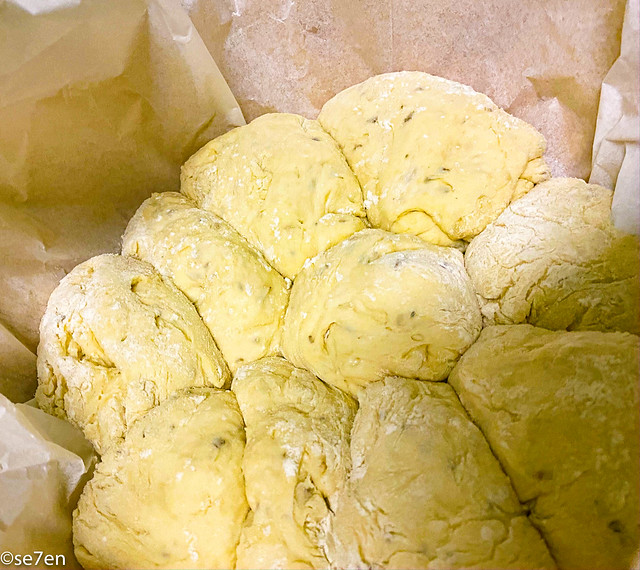
- Continue to pinch and fold your dough thoroughly, every half an hour, and about three or four times. I do this throughout the morning while we are doing school… it helps me to remember to get up and walk around(!). And finally shape your bread on a floured counter into a beautiful round.
- At this stage I either leave it on the kitchen counter for the afternoon and bake before dinner, or I pop it into the fridge overnight to bake for breakfast the following morning.
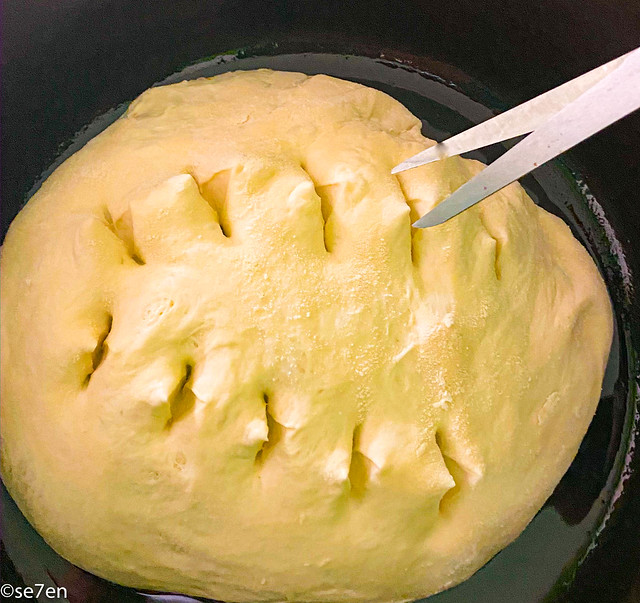
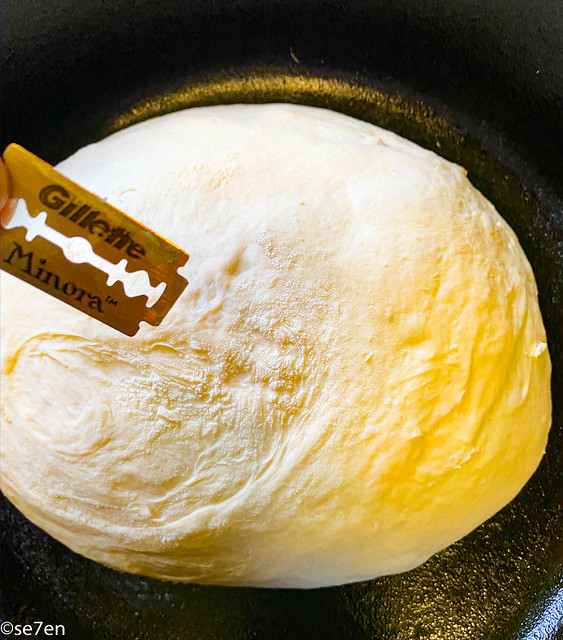
- There is a bit of an art to the baking. Put your pot, we have a cast iron one, into the oven and heat it up to about 250 degrees. Once it is up to temperature, take the pot out and gentled place your bread into it. You will need to create slits in the bread so that steam can escape during the baking… most bakers use a razor blade, but if you don’t have one handy, then a pair of scissors will do.
- With the bread dough tin the pot, put the lid back on your pot and place it into the oven and bake at 220 degrees Celsius for about 20 minutes, then take the lid off and leave the bread baking in the oven for another ten minutes or so, until it is crispy and golden. Take it out the oven and leave it to cool for a few minutes before tucking in.


Other Easy Sourdough Recipes
Now that we have a sourdough started on our counter, and once our daily bread is made, we have used it for countless other recipes.
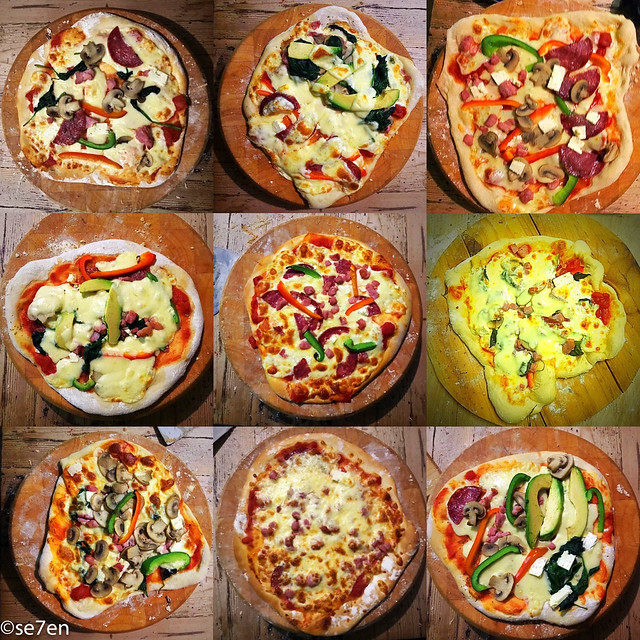
For pizza dough, I use the basic bread dough, and add about a tablespoon of oil to the mixture, for a smoother dough. It makes a lovely crispy base, especially if you have a pizza tile to bake it on.
For sourdough pancakes I use this recipe that I found online, I toss all the ingredients together and then one of the kids will make the pancakes when they see the mixture out on the counter.
Garturstich farm to the rescue, I love their free and easy recipes. We made the basic scone and then we have experimented with whatever cheese we have on the moment, and any greens we can find growing in the herb garden.

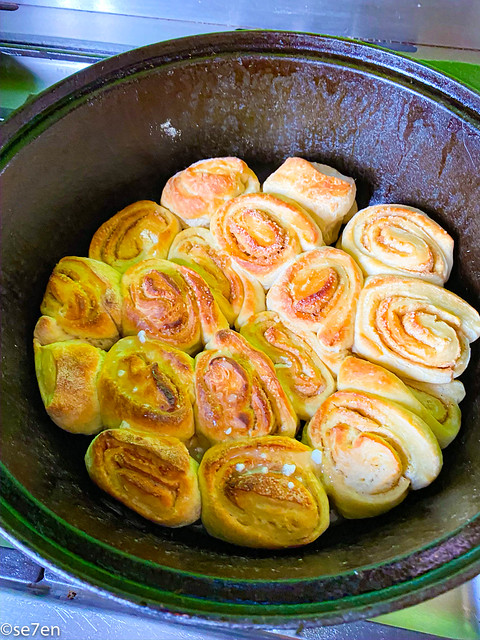
You will find the exact measurements and details in the Gartur Stitch Farm instagram story highlights. Myself, ever the lazy chef, I just replaced the 400g of water in the basic recipe with 400g of (milk + 1 egg + 2 Tablespoons of butter)… and carried on as usual. When I got to the step of “shaping the bread, I simply rolled it out into a rectangle and sprinkled cinnamon sugar over that before rolling it into a cinnamon roll “sausage,” which we cut into chunks and popped into our baking pan.
Mosbolletjies

Mosbolletjies are a staple South African road trip essential and as soon as I made the cinnamon rolls I knew I could create mosbolletjies at home too. So, I replaced the water in the basic recipe with grape juice, and added about two tablespoons of aniseed to the mixture.
Then I followed the directions for basic bread, until the shaping… for mosbolletjies I divided the dough into rolls and placed them in the baking pan. As soon as they were golden on top I removed them from the oven and brushed them with melted apricot jam… Mosbolletjie win and even though we can’t go road tripping right now, we sure can pretend to be heading out.
And that folks is our sourdough journey so far, I am sure we still have lots to discover and will find many many more things to try… but I wanted to post this for those of you, who would like to bake your own bread but keep putting it off… it is a lot easier than I thought it would be and totally worth it. A home baked bread is something to look forward to and cherish… and this is definitely a skill worth discovering.
Previous Bread Posts…
- Our Wholewheat Hiking Bread
- Puffy Pita Breads.
- Wonderful Wraps…
- Irish Soda Bread in Se7en Steps.
- Roosterkoek, Cooked on the Fire.
- Traditional Challah, Jewish Festival Bread.
- Basic Bread in Se7en Steps, using a bread machine.
- Calzone in Se7en Steps.
- Pizza, and Basic Bread Dough in a Bread Machine.
- Brilliant Bread Sticks in Se7en Steps.
- Lockdown Banana Bread, it comes with a story…
- Brilliant Banana Bread to die for in Se7en Steps.
- Greek Easter Bread in Se7en Steps.
- Hot Cross Buns.
- Panattone in Se7en Steps…
Sweet and Celebratory Breads: